


Photo by Viktor Talashuk on Unsplash
How To Upload Raw Files to Cloudinary using Multer and Multer-Cloudinary in Node.js


Cloudinary is a cloud-based image and video management solution that allows developers to upload, store, manage, manipulate, and deliver images and videos for websites and mobile apps. In addition to supporting common image and video formats, Cloudinary also supports a wide range of raw file formats such as PDF, DOC, TXT, and more.
In this tutorial, we’ll explore how to upload raw files to Cloudinary using Multer and Multer-Cloudinary in a Node.js project.
Prerequisites
Before we get started, make sure you have the following:
- A Cloudinary account
- Node.js and npm installed on your system
Setting up the Project
First, let’s create a new Node.js project by running the following command in your terminal:
mkdir multer-cloudinary-raw && cd multer-cloudinary-raw && npm init -y
Next, install the necessary dependencies:
npm install express multer multer-storage-cloudinary cloudinary
Creating the Upload Route
We’ll start by creating an upload route that will handle the file upload. Create a new file named upload.js in the root directory of your project and add the following code:
const express = require(“express”);
const multer = require(“multer”);
const cloudinary = require(“cloudinary”).v2;
const { CloudinaryStorage } = require(“multer-storage-cloudinary”);
const app = express();

cloudinary.config({
 cloud_name: “YOUR_CLOUDINARY_CLOUD_NAME”,
 api_key: “YOUR_CLOUDINARY_API_KEY”,
 api_secret: “YOUR_CLOUDINARY_API_SECRET”,
});

const storage = new CloudinaryStorage({
 cloudinary: cloudinary,
 params: {
 folder: “raw-files”,
 allowed_formats: [“raw”],
 resource_type: “raw”,
 },
});

const upload = multer({ storage: storage });

app.post(“/upload”, upload.single(“file”), (req, res) => {
 res.json({
 message: “File uploaded successfully”,
 url: req.file.path,
 });
});

app.listen(3000, () => {
 console.log(“Server started on port 3000”);
});
In this code, we’re requiring express, multer, cloudinary, and multer-storage-cloudinary, and creating an instance of express.
Next, we’re configuring our Cloudinary credentials using cloudinary.config(). Make sure to replace the placeholders with your own Cloudinary credentials.
We’re then creating a new instance of CloudinaryStorage and passing it our Cloudinary credentials, as well as some additional parameters:
- folder: The folder on Cloudinary where we want to store our files.
- allowed_formats: The file formats we want to allow for upload. In this case, we only want to allow raw files.
- resource_type: The type of resource we’re uploading. In this case, we’re uploading raw files.
Finally, we’re creating a new instance of multer and passing it our storage instance. We’re also defining our upload route, which accepts a single file and responds with a JSON object containing a success message and the URL of the uploaded file.
Configuring the Upload Preset on Cloudinary
Now that we have successfully installed and configured the Multer and Multer-Cloudinary packages, the next step is to configure our Cloudinary account to accept raw files. By default, Cloudinary is configured to accept only image and video files, so we need to create an upload preset that allows raw files.
To create an upload preset, follow these steps:
- Log in to your Cloudinary account and navigate to the Upload Presets page.
- Click on the “Add upload preset” button.
- Enter a name for the preset and select the “Unsigned” option under the “Signing Mode” dropdown.
- Under the “Allowed Formats” field, add the extensions of the raw files you want to accept (e.g. txt, pdf, docx, etc.).
- Under the “Resource Type” field, select the “Raw” option.
- Save the changes.
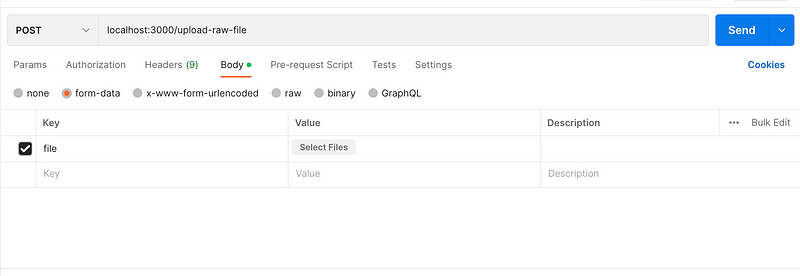
Testing the Setup
With everything configured, we can now test our setup by uploading a raw file using our API endpoint. To do this, simply make a POST request to the API endpoint with a raw file attached in the “file” field. For example:
Conclusion
In this article, we have seen how to save raw files on Cloudinary using Multer and Multer-Cloudinary with Node.js. By following the steps outlined in this article, you should now be able to upload raw files to your Cloudinary account and retrieve them using the Cloudinary URL.